Plastic sports flooring is a kind of floor made of PVC material specially developed for sports venues. Specifically, polyvinyl chloride and its copolymer resin are used as main raw materials, and fillers, plasticizers, stabilizers, colorants and other accessories are added. On a sheet-like continuous substrate, it is produced by a coating process or by a calendaring, extrusion or extrusion process. Divided into indoor sports floor and outdoor sports floor, indoor sports floor is generally a professional sports wood floor, PVC plastic sports floor, acrylic (polyurethane) sports floor, rubber floor and so on. It is generally formed by lamination of multi-layer structures, and generally includes a wear-resistant layer (including UV treatment), a glass fiber layer, an elastic foam layer, a base layer, and the like.
Plastic sports floor features:
1. Comfort:
The surface of the professional plastic sports floor is moderately deformed when impacted, like a sealed mattress with air. When you wrestle or slip, the cushioning effect provided by the closed foam back layer technology can be minimized. Sports injury.
2. Tremorness:
Tremor is the extent to which the floor is deformed by impact. The larger the tremor area, the more likely it is to cause a fracture. There are two types of tremor: tremors and regional tremors.
3. Vibration absorption:
The impulse generated by a person during exercise will cause vibration on the surface of the plastic sports floor. The structure of the floor must have the function of shock absorption, that is, the floor should have the ability to absorb impact energy, and the athletes will be adversely affected by the plastic sports floor. The impact force is much smaller than on hard ground, such as on concrete ground.
4. Friction coefficient:
Studies have shown that 12% of basketball player injuries occur during the rotation of the place. The coefficient of friction of a sports floor indicates whether the floor is too strong (this will reduce the flexibility of rotation) or too slippery (this will increase the risk of slipping). Taking into account the athlete's mobility and safety, the friction coefficient should be between 0.4 and 0.7. The coefficient of friction of plastic sports floor is generally kept between this coefficient, the coefficient of friction of professional plastic sports floor is 0.57, it has sufficient and moderate friction, can guarantee the stability of the movement, and can keep in each moving direction The consistency and regularity of the frictional performance ensures that the flexible movement and the rotation in place are not hindered.
5. Ball rebound:
The resilience test is to drop the basketball from a height of 6.6 feet to the sports floor and test the rebound height of the basketball. This data is expressed as a percentage. The rebound height of the basketball on the concrete floor is the comparative standard, reflecting the difference in rebound height. Indoor rules for ball games require that, with the help of ground sports competitions or training, such as basketball and other ball movements of the take-off movement and sphere rebound, the sphere's rebound coefficient on the court floor should be greater than or equal to 90%. The more professional plastic sports flooring has outstanding and stable ball rebound elasticity, there is no elastic dead point on the floor, and its rebound coefficient is up to 98%.
6. Sports energy return:
This refers to the movement energy of the plastic sports floor that is returned when the athlete moves, in order to improve the exercise performance.
7. Rolling load:
The load-bearing load, firmness and service life of professional sports flooring must meet the requirements of competition and training. If the movable basketball stands and related sports facilities move on the floor, the surface layer and structure of the floor cannot be damaged. This is the German DIN standard. The described rolling load standards and concepts.
Plastic floor construction process
With high-quality floor materials, professional installation and laying techniques are also required to achieve the most perfect results. The flooring is not only a product, it is also a complete system. The standardized construction process, advanced special tools and careful operation of professionals ensure that we can satisfy our customers' relentless pursuit of high-quality ground building materials systems.
1, the technical basis
1) Party A provides floor construction drawings
2) The actual situation at the construction site
3) Floor construction quality and acceptance requirements
4) After maintenance
5) Construction progress
2, construction preparation
(A) Ground pre-check project and standard before construction
1) Strength
Fine stone screed (or cement mortar) strength grade greater than C20, hardness tester test results should be the surface hardness of not less than 1.2 MPa. Fine stone screed (or cement mortar) shall not be hollowed, cracked, or sanded.
2) Ground flatness
Within 2m range the height error is within 3mm (2m long detection ruler detection).
3) Dryness
Before construction, ensure that the ground is dry, the concrete or mortar leveling layer exceeds the final curing period of at least 28 days, and the moisture content of the base layer should be less than 3% using the CNN moisture content tester.
4) Waterproof
In areas such as bathrooms, washrooms, and boiled water that may be in contact with water for a long period of time, the walls and floors shall be provided with a waterproof layer (the height of the waterproof layer above the wall shall not be less than 30cm). The elevation of toilets, washrooms, and boiled waters should be 3-5cm below the ground elevation of other parts.
The floor of the ground floor, the civil building (or decoration) should be a good moisture barrier.
5) Height difference at the junction with other materials
Other floor material junctions (carpets, marble, wooden floors, floor tiles, etc.) shall have a height difference of minus 4-6 mm. The linoleum flooring shall be laid with H ≥ 10mm at the bottom of the front door to the ground.
6) Cross construction
Cross-construction of construction materials is prohibited. The construction materials entering the site shall be arranged after all previous processes have been completed or before the final coating.
7) Construction period
In construction, each process has a certain period of maintenance, and the construction of the later stage is more refined. In order to guarantee construction quality, sufficient construction period must be ensured.
(b) Primary treatment: floor polishing
Before laying the floor, the floor must be leveled with the mortar C15 for 28 days to 35 days. The leveling height is 5mm lower than the ground design height. The surface of the screed should be smooth. The ground floor needs to be clean, free from grease and mold release agent, and the screed must have sufficient bearing capacity, without cracks, empty drums, and sanding. During the construction period, all floors that require linoleum flooring should be kept dry. Where it is connected to other materials, the other ground must be installed first, so that the interface can be well handled to ensure the smoothness of the interface. The construction of the floor is usually carried out in the final step of the installation, avoiding cross construction.
Required work and equipment:
1) F-30 Grinding Machine Function: Abrasion of a large area of ​​high-level parts. (greater than 4mm)
2) The role of portable grounding machine: grinding off a small area of ​​the high part of the floor. (less than 4mm)
3) The role of Wolf Mill: Surface treatment after self-leveling is completed.
4) floor detector role: detection of uneven floor.
5) Vacuum cleaner
(III) Self-leveling cement construction technology
1) Preparation before construction
The use of self-leveling cement is the most basic guarantee for guaranteeing the construction quality and decoration effect of the floor. Due to its importance, construction must be strictly followed.
Before the self-leveling cement is applied, the foundation ground must be treated to remove impurities, dust and sand from the ground. Raise the level of the ground that is higher in parts. Clean the ground dust after grinding.
Before the construction of the self-leveling surface requires interface treatment agent (commonly known as base oil). The interface treatment agent is diluted with the treatment agent according to the manufacturer's requirements, and diluted with a roller on the floor. Apply the floor treatment agent evenly to the floor in the direction of the first horizontal stiffener. Make sure to apply evenly without leaving gaps. Apply twice to the highly absorbent floor. After the coating agent is applied, the construction of the above self-leveling cement can be performed after waiting for a certain period of time according to the performance of different manufacturers.
The cement surface treatment agent can increase the self-leveling cement's adhesion to the ground and prevent the shelling and cracking of the self-leveling cement.
2) Self-leveling
Prepare a sufficiently large bucket, add water in accordance with the water-cement ratio of the self-leveling manufacturer, and mix the self-leveling thoroughly with an electric mixer. The stirring is carried out twice, usually for about 5-7 minutes for the first time, with a pause of 2-3 minutes in the middle to let it react, and then for about 3 minutes. Stirring should be thorough, no block or dry powder can appear. The stirred self-leveling cement must be fluid.
Stir the self-leveling as much as possible within half an hour. Pour the self-leveling cement on the ground and use a toothed target to open the self-leveling target and target the area to different sizes according to the required thickness (minimum not less than 2 mm thick). After its natural leveling, it is rolled vertically and horizontally with toothed rollers, and the gas is released to prevent foaming. Special attention must be paid to the formation of a self-leveling cement lap.
According to the different temperature, humidity and ventilation conditions of the site, the self-leveling cement must be thoroughly dried after 8-24 hours, and the next step of construction cannot be completed before the dryness.
(d) Paving of floor materials
1) Pre-paving and laying of floors
Before adhering to the floor, it is best to use a sander to polish the self-leveling and clean the dust after grinding.
A. First, make a good laying plan. For large areas, consider the following factors:
Write the color code of the coil and the layout of the most economical materials on the drawings and plans of each room. Be careful not to use different lot numbers of materials in the same room.
The important factors that determine the direction of the web are:
The distribution of membranes throughout the room, the influence of light and the structure of the room.
Add a room membrane.
Try to avoid cross joints.
Ensure the use of electricity, water, and transportation tools as much as possible.
B, drawing line and cutting
The web is laid on the ground and the web is cut to the required length (including reserved margins).
Put the long end of the coil against the wall or the corner line, and let the other end rest against the other wall. Use a long line drawing device to draw a wall shape on the coil, and then slowly cut the material according to the line.
Remove the trimmed material and push the floor against the wall. Along the other long side of the floor, use a pencil to draw a vertical line on the ground, and draw a crosshair on the edge of the membrane and the ground. The distance between the two horizontal intersections along the first horizontal pencil line can be set on the long line drawing device. Use the long drawn line to draw a line on the top of the roll and cut it.
C, bonding
Half of the coil rolled up and began to glue on the ground. Note that the area of ​​each application does not exceed half the area of ​​a single roll. Cover the floor and repeat compaction with a special roller. Note that when rolling, roll horizontally and longitudinally first to squeeze out the residual gases under the floor. The other half is the same as above.
When laying the second floor, pay attention to keep the floor in the same direction. The adjacent floor is laid to overlap 15mm, and then use a line drawing device to draw lines and cut.
In order to seal the seams, remove dirt and debris from the floor and the back of the coil before applying glue, and leave a postcard-thick seam between the seams to facilitate slitting.
D. Welding of the floor
Welding is best done on the second day of bonding.
Use a hand sewing machine or an electric sewing machine to open the seam. The width of the slit must not exceed 3.5 mm and the depth must not exceed 2.5 mm.
The welding temperature must be set to 350-400 degrees. Before moving the gun, press the gun in the seam for a few seconds. The welding speed should be between 1.5-2.5 m/s. Immediately after the welding of the electrode, the additional electrode was used to trim the electrode. Flatten the ground with a curved knife after cooling completely.
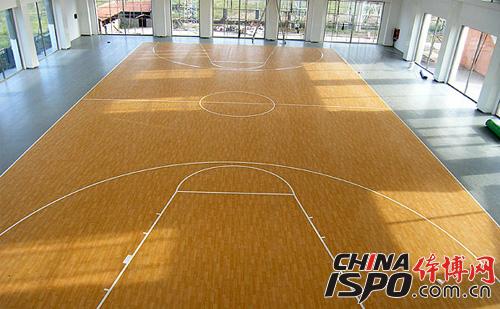
Plastic sports floor Scope:
Plastic sports flooring is widely used in various sports venues such as: badminton, table tennis, volleyball, tennis, basketball, handball, indoor soccer competitions and training venues, multi-purpose gymnasiums, gymnasiums, dance studios, schools, and union activities Room, multi-purpose hall, amusement park, kindergarten, sports shop, office, hotel, hospital, etc.
Related Reading:
"Pvc sports floor installation, maintenance and process technology requirements"
Http://
Ten Ways to Pick a Sports Floor
Http://
Professional Food Printer for cakes,biscuit,chocolates
1.The Chocolates Printer is used to print pictures on food.
2.It has 6 colors which can print colorful and bright pictures.
3.The print effect is vivid.
4.The machine can replace the Manual labor.

5-35º
Name
Chocolates printer
Print head
DX5
Print size
21*38cm
Print color
CMYK+LC LM
Print speed
A4 photo/163s
Printing resolution
5760*1440dpi
Nozzles
90*6=540
Interface
USB 2.0
Net weight/Gross weight
35kg/42kg
Printer size
57*48*44cm
Height adjustment
Handle/Automatic
Working power
110-220 50-60Hz 30W
Operation system
Windows 2000/XP/WIN7/Vista etc.
Temperature
Chocolates Printer
Chocolates Printer,Food Chocolate Printer,3D Chocolates Printer,Digital Chocolates Printer
Shenzhen Refinecolor Technology Co., LTD. , https://www.rfcprinter.com